How to Replace Wiper Blades and Refills Without Scratching Your Windshield
By DealShore Motors
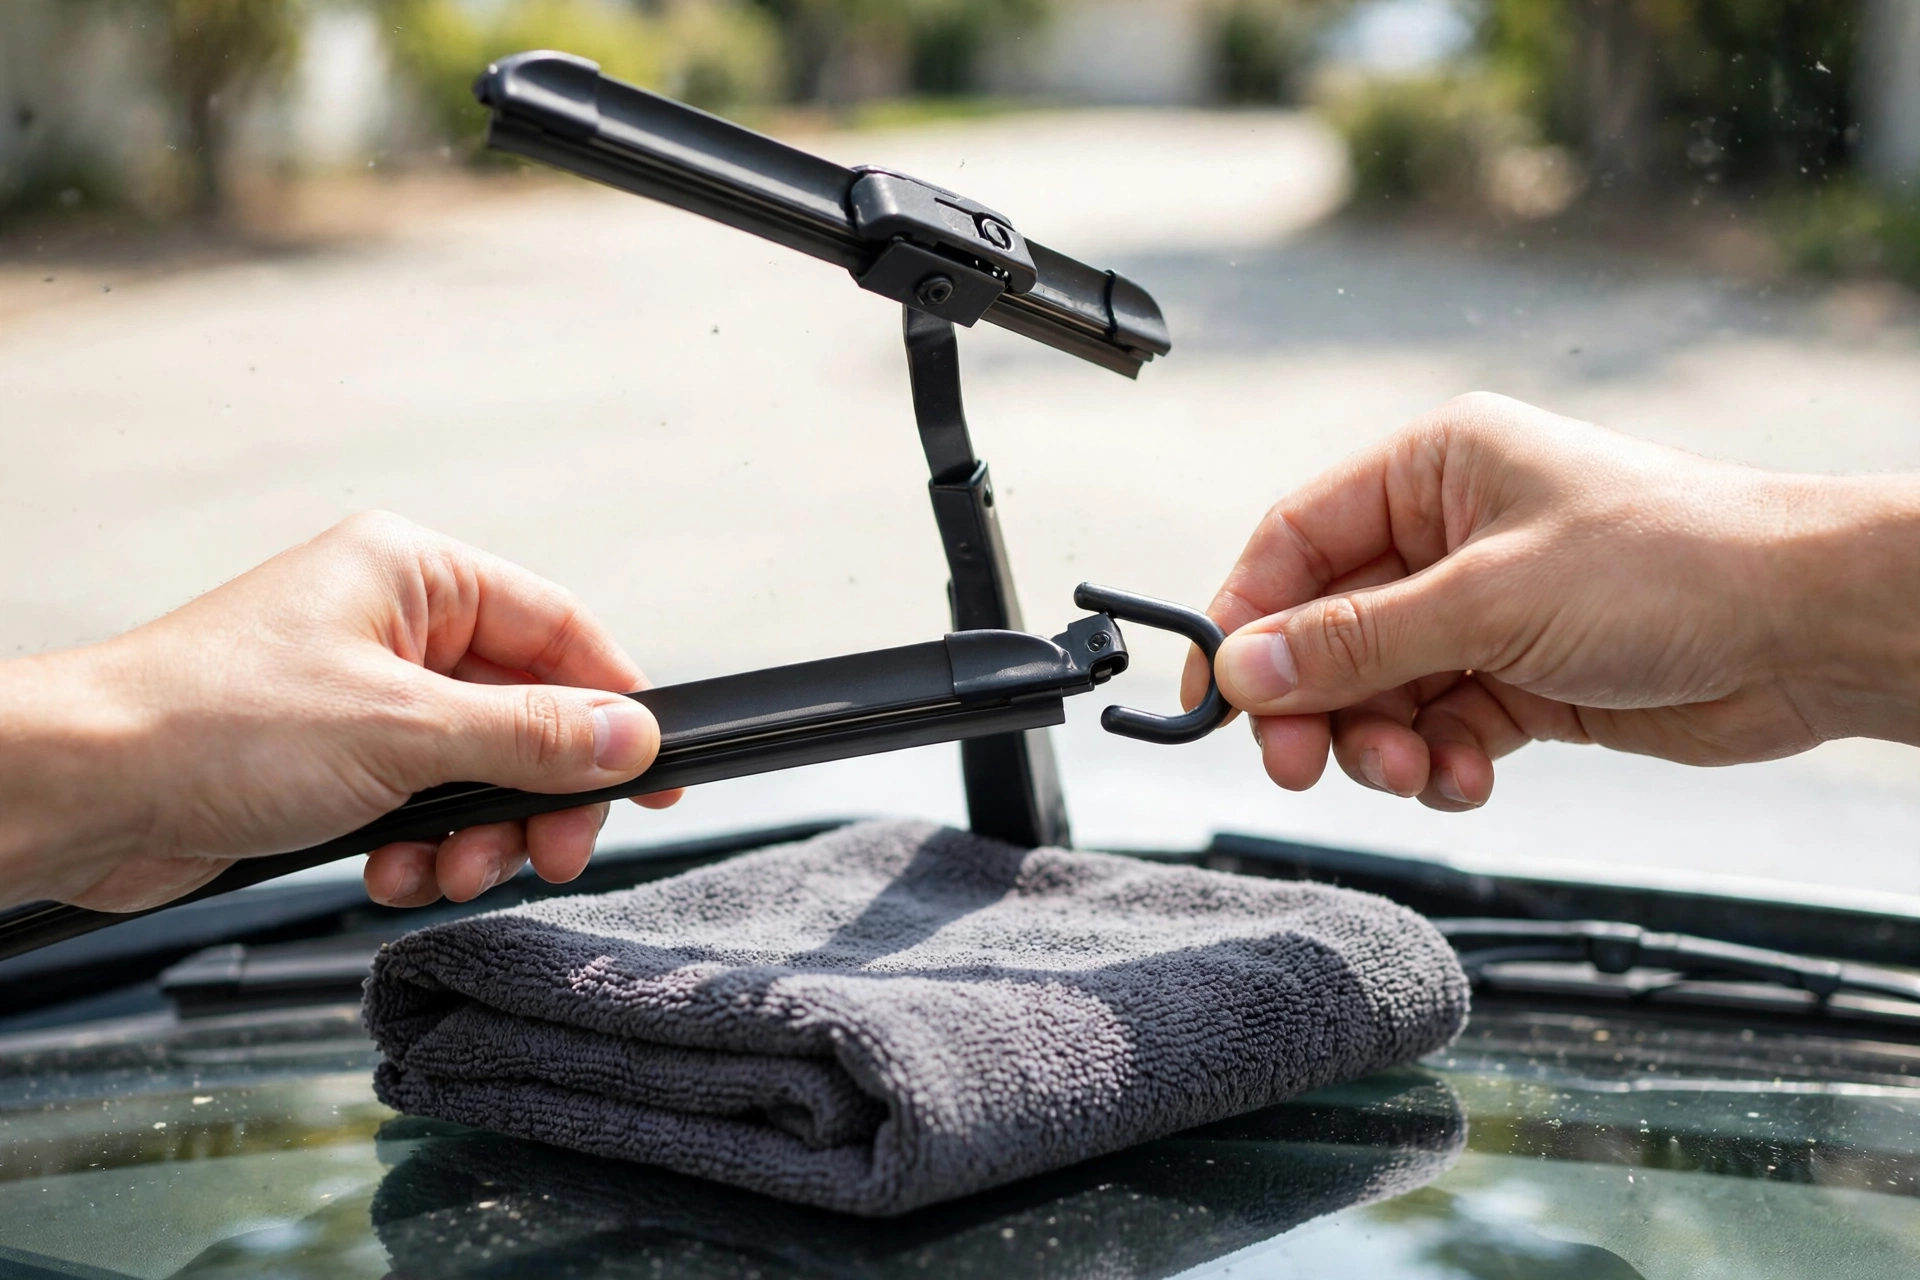
Here is the most expensive second in all of DIY car care: you have the old wiper blade off, the bare metal wiper arm is standing up off the glass — and it snaps back. That arm is spring-loaded, and bare metal hitting a windshield can chip or crack it on the spot. A windshield replacement runs roughly $300 to well over $1,000 once camera calibration is included. The job itself takes about ten minutes, needs no tools on most cars, and has exactly one dangerous moment. This guide walks you through both blades — and the rear one everyone forgets — with that moment flagged before you ever reach it.
A wiper blade is the whole removable assembly that clicks onto the wiper arm: frame or beam, plus the rubber squeegee (the thin rubber edge that actually touches the glass). A refill (also called an insert) is just that rubber strip, sold separately for blades designed to accept one. Most modern beam blades are not refillable — you replace the whole blade. Older conventional frames often are. Knowing which you own decides what you buy, and it is the first thing this guide sorts out.
The 30-Second Version
- Buy the correct sizes for driver side, passenger side, and rear (if fitted) — the two front blades are usually different lengths. Confirm the connector type on your arm before you pay.
- Park, engine off. Fold a thick towel or blanket on the windshield under each wiper before you lift anything.
- Lift the wiper arm until it stands upright on its own, perpendicular to the glass.
- Turn the old blade so it forms a T with the arm. Press the small release tab where the blade meets the arm and slide the blade down and off the hook.
- Keep one hand on the arm the whole time. Never walk away with a bare arm standing up.
- Slide the new blade onto the hook until it clicks. Tug it gently to confirm it is locked.
- Peel the protective plastic strip off the new rubber edge (beam blades ship with one — leaving it on is the #1 cause of “new blades that streak”).
- Lower the arm gently onto the glass. Repeat on the other side, then test with washer fluid.
Tools needed: none on most cars. Optional: a small flathead screwdriver for stubborn release tabs, glass cleaner and a microfiber towel.
Socket sizes: none.
Estimated time: about 5 minutes per blade the first time; 10 minutes for both fronts, plus 5 for the rear.
Difficulty: 🔧 out of 5 wrenches — the easiest job on the car, with one glass-breaking trap.
When Are Blades Actually Done?
Rubber dies by calendar, not just by use. Sun, heat, ozone, ice, and road grit harden and nick the edge even on a car that barely drives. Common guidance from manufacturers and repair networks is replacement every 6 to 12 months, checked at every season change. Replace sooner if you see any of these:
- Streaking or smearing — lines or a filmy haze left after each pass.
- Chattering or skipping — the blade judders and hops across the glass instead of gliding.
- Squeaking that continues after you wet the glass with washer fluid.
- Cracked, split, torn, or stiff rubber, or an edge that has gone rounded instead of square.
- Missed bands — a stripe in the middle of the sweep the blade never touches, usually a tired frame or beam losing contact.
Brutal honesty, two ways. First: streaks are not always the blade’s fault. A windshield filmed with wax, tree sap, and road oil will streak under brand-new blades — clean the glass properly before you blame the rubber. Second: do not stretch dead blades “one more season.” Once the rubber splits through, the harder backing or frame can drag across the glass and scratch an arc into the windshield that no blade change will ever fix. A $30 pair of blades is cheap insurance against a four-figure windshield.
Blade or Refill: What Are You Actually Buying?
- Full blade (most common today): the complete assembly — beam or frame plus rubber — that clicks onto the arm. This is what nearly all modern cars use, and what every pick in this guide is.
- Refill / insert: only the rubber strip, slid into the claw channels of a refillable conventional frame. Cheaper (often $8–$10), and the right move if your frames are straight and the claws are not corroded. Owners of older Volkswagens and Toyotas with factory aero blades do this routinely.
- The trap: beam blades from most aftermarket brands have the rubber bonded or locked in — there is no refill for them, whatever a listing implies. If your blade has no visible end caps or claw channels, buy the full blade and do not waste an afternoon trying to dissect it.
Get Two Things Right Before You Buy: Size and Connector
Size. Wiper sizes are given in inches, roughly 9″ to 32″ across all cars, and the driver and passenger sides are usually different (a common pairing is 26″ driver / 16–20″ passenger). A blade one inch too long can strike the windshield edge or the other blade; too short leaves an unwiped wall of water in your sightline. Get the sizes from the owner’s manual, the fitment checker on the product page, or by measuring the old blade end to end. Never guess from the model name alone — the same model can ship with different sizes by year and trim.
Connector. The blade must match the fitting on the end of your wiper arm (the spring-loaded metal arm attached to the car). The five you will actually meet:
| Connector | What it looks like | How it releases | Where you find it |
|---|---|---|---|
| J-hook / U-hook (9×3 or 9×4 mm) | Curved hook at the arm’s end | Press the tab under the connector, slide the blade down off the hook | The large majority of cars |
| Pinch tab | Flat arm end, tabs on both sides of the blade connector | Squeeze both tabs, pull the blade straight off | Many Asian and American models |
| Push button / top lock | Flat arm with a button on top of the connector | Press the button, slide the blade forward off the arm | Many modern European models |
| Side pin | Small round pin sticking out of the arm’s side | Press the lock, slide the blade along the pin | Some German brands and SUVs |
| Bayonet | Flat, blade-like arm end | Lift the locking tab, pull straight off | Older vehicles |
Most quality blades include adapters for several connector types in the box — but “universal” on the package does not guarantee your connector is among them. Check the box’s fit list against your arm before you tear the old blade off in a rainy parking lot.
Conventional vs. Beam vs. Hybrid vs. Winter vs. Silicone
| Type | How it works | Strengths | Weaknesses | Typical price per blade |
|---|---|---|---|---|
| Conventional | Steel frame with claw pressure points | Cheapest; refillable on many models | Pressure points freeze and clog with ice; uneven wipe as the frame ages | About $7–$15 |
| Beam (flat/aero) | One pre-tensioned spring-steel strip inside the rubber | Even pressure along the whole curve; nothing to clog in winter; best all-round pick for most cars | Rubber usually not refillable | About $15–$33 |
| Hybrid | Frame structure under a streamlined aero cover | Sturdy pressure + cleaner aerodynamics; common factory fit on Japanese models | Pricier than conventional; cover can trap debris | About $15–$30 |
| Winter | Conventional frame sealed inside a rubber boot | Sheds snow and ice; stays flexible in deep cold | Heavy; poor choice in summer heat; shorter season life | About $15–$25 |
| Silicone | Beam or frame with a silicone (not natural rubber) edge | Maker claims of roughly double the service life; strong heat/cold tolerance | Costs the most; benefit only pays off if you keep the car | About $25–$35 |
Prices are typical US retail ranges as of October 2026 and vary by size and brand. Selection guidance is research-backed from manufacturer specifications and owner data — not first-hand testing.
For most drivers in most climates, a mid-priced beam blade is the honest answer. Conventional blades still make sense on older cars with refillable frames. Silicone earns its premium in brutal heat (Caribbean, Gulf Coast, Southwest) where natural rubber bakes hard in months — a point Caribbean and Haiti drivers should weigh, because sun, not rain, is what kills blades there.
Before You Start: The Safety Warning That Matters
⚠️ Warning — read this before you lift an arm. A wiper arm is held against the glass by a strong spring. With the blade removed, nothing cushions it. If that bare arm snaps back onto the windshield, the metal hook can chip or crack the glass instantly. So: (1) lay a folded towel or blanket on the glass under the wiper before you start, (2) keep a hand on the arm whenever the blade is off, and (3) never leave a bare arm standing while you open a package or answer your phone. Every cracked-windshield story in owner forums starts with one of those three being skipped.
Two more ground rules. Engine off — on some cars the wipers can sweep without warning if the rain sensor wakes. And if your car hides the wipers under the hood edge (many modern European and some Asian models), put them in service position first: typically, switch the ignition on then off and tap the wiper stalk once within a few seconds, and the arms park upright in the middle of the glass. Your manual has the exact sequence for your car. Forcing a hidden wiper up by hand can bend the arm or chip the hood edge paint.
Working at the windshield means leaning over the front of the car, not under it — no jack needed for this job. But the driveway habits in our jack-stand safety guide and our $250 starter tool kit guide are the foundation for every bigger job in this series.
The Main Job: J-Hook Blades, Step by Step
This covers the large majority of cars. Other connectors follow below — the protection steps are identical.
1. Prep the glass. Park on level ground, engine off. Spray washer fluid or glass cleaner and run the old wipers once to clear grit — dragging a blade (or your towel) over dry grit scratches glass. Fold your towel on the windshield where the blade rests.
2. Lift the arm to the service position. Grip the arm (not the blade) and lift it away from the glass until it locks upright, perpendicular to the windshield. It should stay standing on its own.
3. Form the T. Rotate the blade on the arm until blade and arm form a T (the blade horizontal, the arm vertical). This lines the connector up for release.
4. Release the old blade. Find the small tab or clip on the underside of the connector, in the middle of the blade. Press it in with a thumb (or lift it gently with the flathead screwdriver) and, holding the tab, slide the blade down along the arm, away from the hook’s curve, until the hook clears the connector. The blade comes free in your hand.
5. Control the arm. Immediately fold the bare arm’s hook gently down onto the towel — or keep your other hand wrapped around it while you open the new blade’s package with your teeth and optimism. Towel down, arm down: that is the safe state.
6. Prep the new blade. If the new blade’s connector arrives closed, open its adapter cover as the package shows. Note which way the blade’s aero spoiler (the curved lip on beam and hybrid blades) faces: it must face into the wind, toward the front of the car, when the blade is parked. Fitted backwards, a beam blade lifts and chatters at highway speed.
7. Click the new blade on. Raise the arm, thread the hook through the new blade’s connector opening, and pull the blade up into the hook until you hear and feel a click. Give it a firm tug — a blade that is not locked can leave the arm at 60 mph, and it happens more often than brands admit.
8. Strip the protector. Peel off the plastic shipping strip covering the rubber edge. Run a finger lightly along the edge: it should feel like a clean, sharp squeegee. If your new blade has a wear-indicator dot under that strip, note its color — it changes as the blade ages.
9. Lower and test. Ease the arm back onto the glass. Repeat steps 2–8 on the other side. Then sit in the car, spray washer fluid generously, and run the wipers through every speed. You want a clean, quiet sweep with no streaks, no hopping, and no blade overrunning the glass edge. A brand-new beam blade that streaks on its first wet pass usually just needs the activation wipe its maker describes (some water-repellent blades ask for about two minutes of running on a wet windshield) — or it still has its shipping strip on. Check the strip first.
The Other Connectors, Briefly
- Pinch tab: squeeze the two side tabs together and pull the blade straight off the arm end. New blade pushes straight on until both tabs click out into their slots.
- Push button / top lock: press the button on top of the connector and slide the blade forward, off the arm’s flat end. New blade slides back on until the button pops up through its hole.
- Side pin: press the small locking tab and slide the blade sideways off the pin. New blade slides onto the pin until the lock engages.
- Bayonet: lift the locking lever or tab on the connector and pull the blade straight off the flat arm. New blade pushes on and the lever closes over it.
Every one of these follows the same law: towel on the glass, hand on the arm, listen for the click, tug to prove it.
The Rear Wiper Everyone Forgets
Hatchbacks, wagons, and SUVs carry a rear wiper that dies quietly — you only notice when you reverse in rain and see nothing. The job is the same in miniature, with two differences: the blade is usually shorter (10″–16″), and the connector is often hidden under a plastic cap at the arm’s base that flips or pries up gently. Some rear arms only lift a few inches off the glass by design — do not force them further; work within the space or check the manual for a service position. Replace the rear blade on the same day as the fronts and you will never think about it again.
Refills: The 10-Minute Version (Conventional Frames Only)
If your conventional frames are straight and refillable: note how the old rubber strip sits, slide it out of the frame’s claw channels (a locking notch at one end releases it), thread the new refill through the same claws in the same order, seat the locking notch, and trim any excess rubber flush with the frame end if your refill is a cut-to-length type. Then refit the blade to the arm exactly as above. If a claw is bent or corroded, stop — a refill in a bad frame wipes worse than a cheap new blade.
What Owners Get Wrong (Paraphrased From Owner Forums)
The recurring disasters are almost never the blade itself. They are: bare arms snapping back and starring a windshield because no towel was laid down; new blades “that streak from day one” because the shipping strip was never peeled; blades fitted one inch too long that slap the A-pillar or each other; beam blades mounted spoiler-backwards that lift and howl on the highway; and passenger and driver blades swapped, leaving the long blade where the short one belongs. Every one of those is a ten-second check inside this guide.
DealShore Picks: Blades Owners Actually Buy
Wiper blades are size- and connector-specific — confirm your exact sizes and arm type with the fitment checker on the product page before ordering. These picks are research-backed selections from manufacturer specs and owner data, framed by the criteria that matter: edge material and durability, even pressure on curved glass, and connector coverage. This is a product-comparison topic, so here is the verdict up front: Best Overall — Bosch ICON (beam). Best Value / Water-Repellency Pick — Rain-X Latitude 2-in-1. Rear-Wiper Pick — Bosch H308.
| Pick | Type | Edge / key feature | Connector notes | Price tier |
|---|---|---|---|---|
| Bosch ICON (e.g., 26A/20A pair) | Beam | Dual-rubber compound; Bosch claims up to 40% longer life than other premium blades | Hook adapter for 9×3 / 9×4 J-hooks; “OE” versions cover other arm types | Premium |
| Rain-X Latitude 2-in-1 (22″) | Beam | Applies Rain-X water-repellent coating to the glass as it wipes | Pre-installed J-hook adapter plus additional adapters in pack | Mid |
| Bosch H308 (12″) | Rear blade | OE specialty rear blade, graphite-blended rubber | Rear-arm specific (pinch-tab type fitments) — verify your rear arm | Mid |
Best Overall: Bosch ICON beam wiper blades, 26A/20A pair — the long-running premium beam line, with tension-spring arcing for even pressure on curved windshields. Check that your car takes this size pairing and a hook arm before ordering.
Best Value: Rain-X Latitude 2-in-1 water repellency wiper blade, 22″ — a beam blade that lays down water-repellent treatment as it runs, so rain beads and clears at speed. Sold per blade; order your driver and passenger sizes separately.
For the rear window: Bosch H308 OE specialty rear wiper blade, 12″ — rear blades are arm-specific, not interchangeable with fronts; confirm your hatch or SUV’s rear fitment on the product page.
When you buy through our links, we may earn an affiliate commission at no extra cost to you.
The Bottom Line
Ten minutes, no tools, about $30–$60 for a pair — and the only way to turn it into a $1,000 mistake is to let a bare arm slap the glass. Towel down, hand on the arm, click, tug, peel the strip, test with washer fluid. Replace in pairs every 6 to 12 months, sooner in punishing sun or ice, and do the rear blade the same day. Clear glass is the cheapest safety equipment on your car — this is the easiest job in the whole DIY series to keep current.
Next in the DIY series: testing and replacing a dead 12V battery in your driveway. New guides every week from DealShore Motors.
Sources
- Connector types, release methods, and blade styles (conventional / beam / hybrid) — AxleAddict wiper replacement guide: https://axleaddict.com/repair-maintenance/how-to-replace-windshield-wipers ; EngineerFix windscreen wiper guide: https://engineerfix.com/how-to-change-your-windscreen-wipers/ ; AutoWin connector cheat sheet: https://www.autowin.com/blogs/news-faq/how-to-change-wiper-blades-in-vehicle
- J-hook removal and installation sequence — AutoZone how-to (transcript): https://www.autozone.com/diy/videos/how-to-remove-install-j-hook-wiper-blades-autozone-how-to-videos-177859530
- Replacement interval (6–12 months) and wear signs (streaking, chattering, cracked rubber, skipping) — Crash Champions: https://crashchampions.com/company/knowledge-center/when-and-how-replace-your-wiper-blades ; NAPA Auto Care: https://napacarcare.com/auto-repair-tips/replace-wiper-blades-for-improved-visibility
- Worn blades scratching and hazing windshield glass — Crystal Glass: http://crystalglass.ca/worn-wiper-blades-how-they-hurt-your-view-and-your-windshield/
- Product specifications and maker claims — Amazon listings linked in the picks box above (Bosch ICON 26A/20A, Rain-X Latitude 5079279-2 line, Bosch H308) and the Bosch wiper blade catalog: https://www.boschautoparts.com/documents/647135/656897/2025+Bosch+Wiper+Blade+Catalog.pdf/5e6dc4e9-1fc1-8168-e9d0-691c07945690?t=1771020654646&download=true ; verify fitment for your vehicle before ordering.
Sizes, intervals, and prices current as of October 2026 and vary by model and market — your owner’s manual wins any disagreement with this guide.
Leave a Reply